Flare Audio Isolate 2 Earplugs – The Gear

When I first entered the world of motorcycling there were a number of factors I failed to fully appreciate. One was certainly the impact on my poor ears. As a keen musician the addition of biking to my life was a step too far and about a year in I began to notice my hearing wasn’t appreciating my passion for 2 wheels. I’ve since come to the conclusion that however well your bike cocoons you and however many hours your helmet spent in a wind tunnel during development earplugs are a must. Enter the Flare Audio Isolate 2 earplugs.

Earplugs are something of a minefield, there are as many brands, types and styles as there are people. But not all are equal and I think I’ve found my favourite in the form of Flare’s Isolate range. Flare have been around for a little while now but seem more prominent in the world of musicians and sound engineering (which is where I first came across the brand). Flare have grown through several iterations of their Isolate ear plugs widening their range with inovative products such as their ‘Sleep’ and ‘Calmer’ plugs.

Like many bikers I spent years using disposable plugs, cheap and relatively cheerful. Specifically I used the 3M Ear FX plugs that are without a doubt a great plug if a little on the big side. I pondered moulded plugs for a while but decided against it on the basis that contrary to popular belief they don’t last forever and realistically need replacing routinely. Instead I set about trying the various reusable off the shelf products. Most were useless, popping out like annoying little rockets at random intervals or simply never blocking the sound in the first place. Auritech’s plugs did a fair job and will work for some but I ultimately decided to give Flare’s offering a go following some favourable reviews on sound engineering forums.

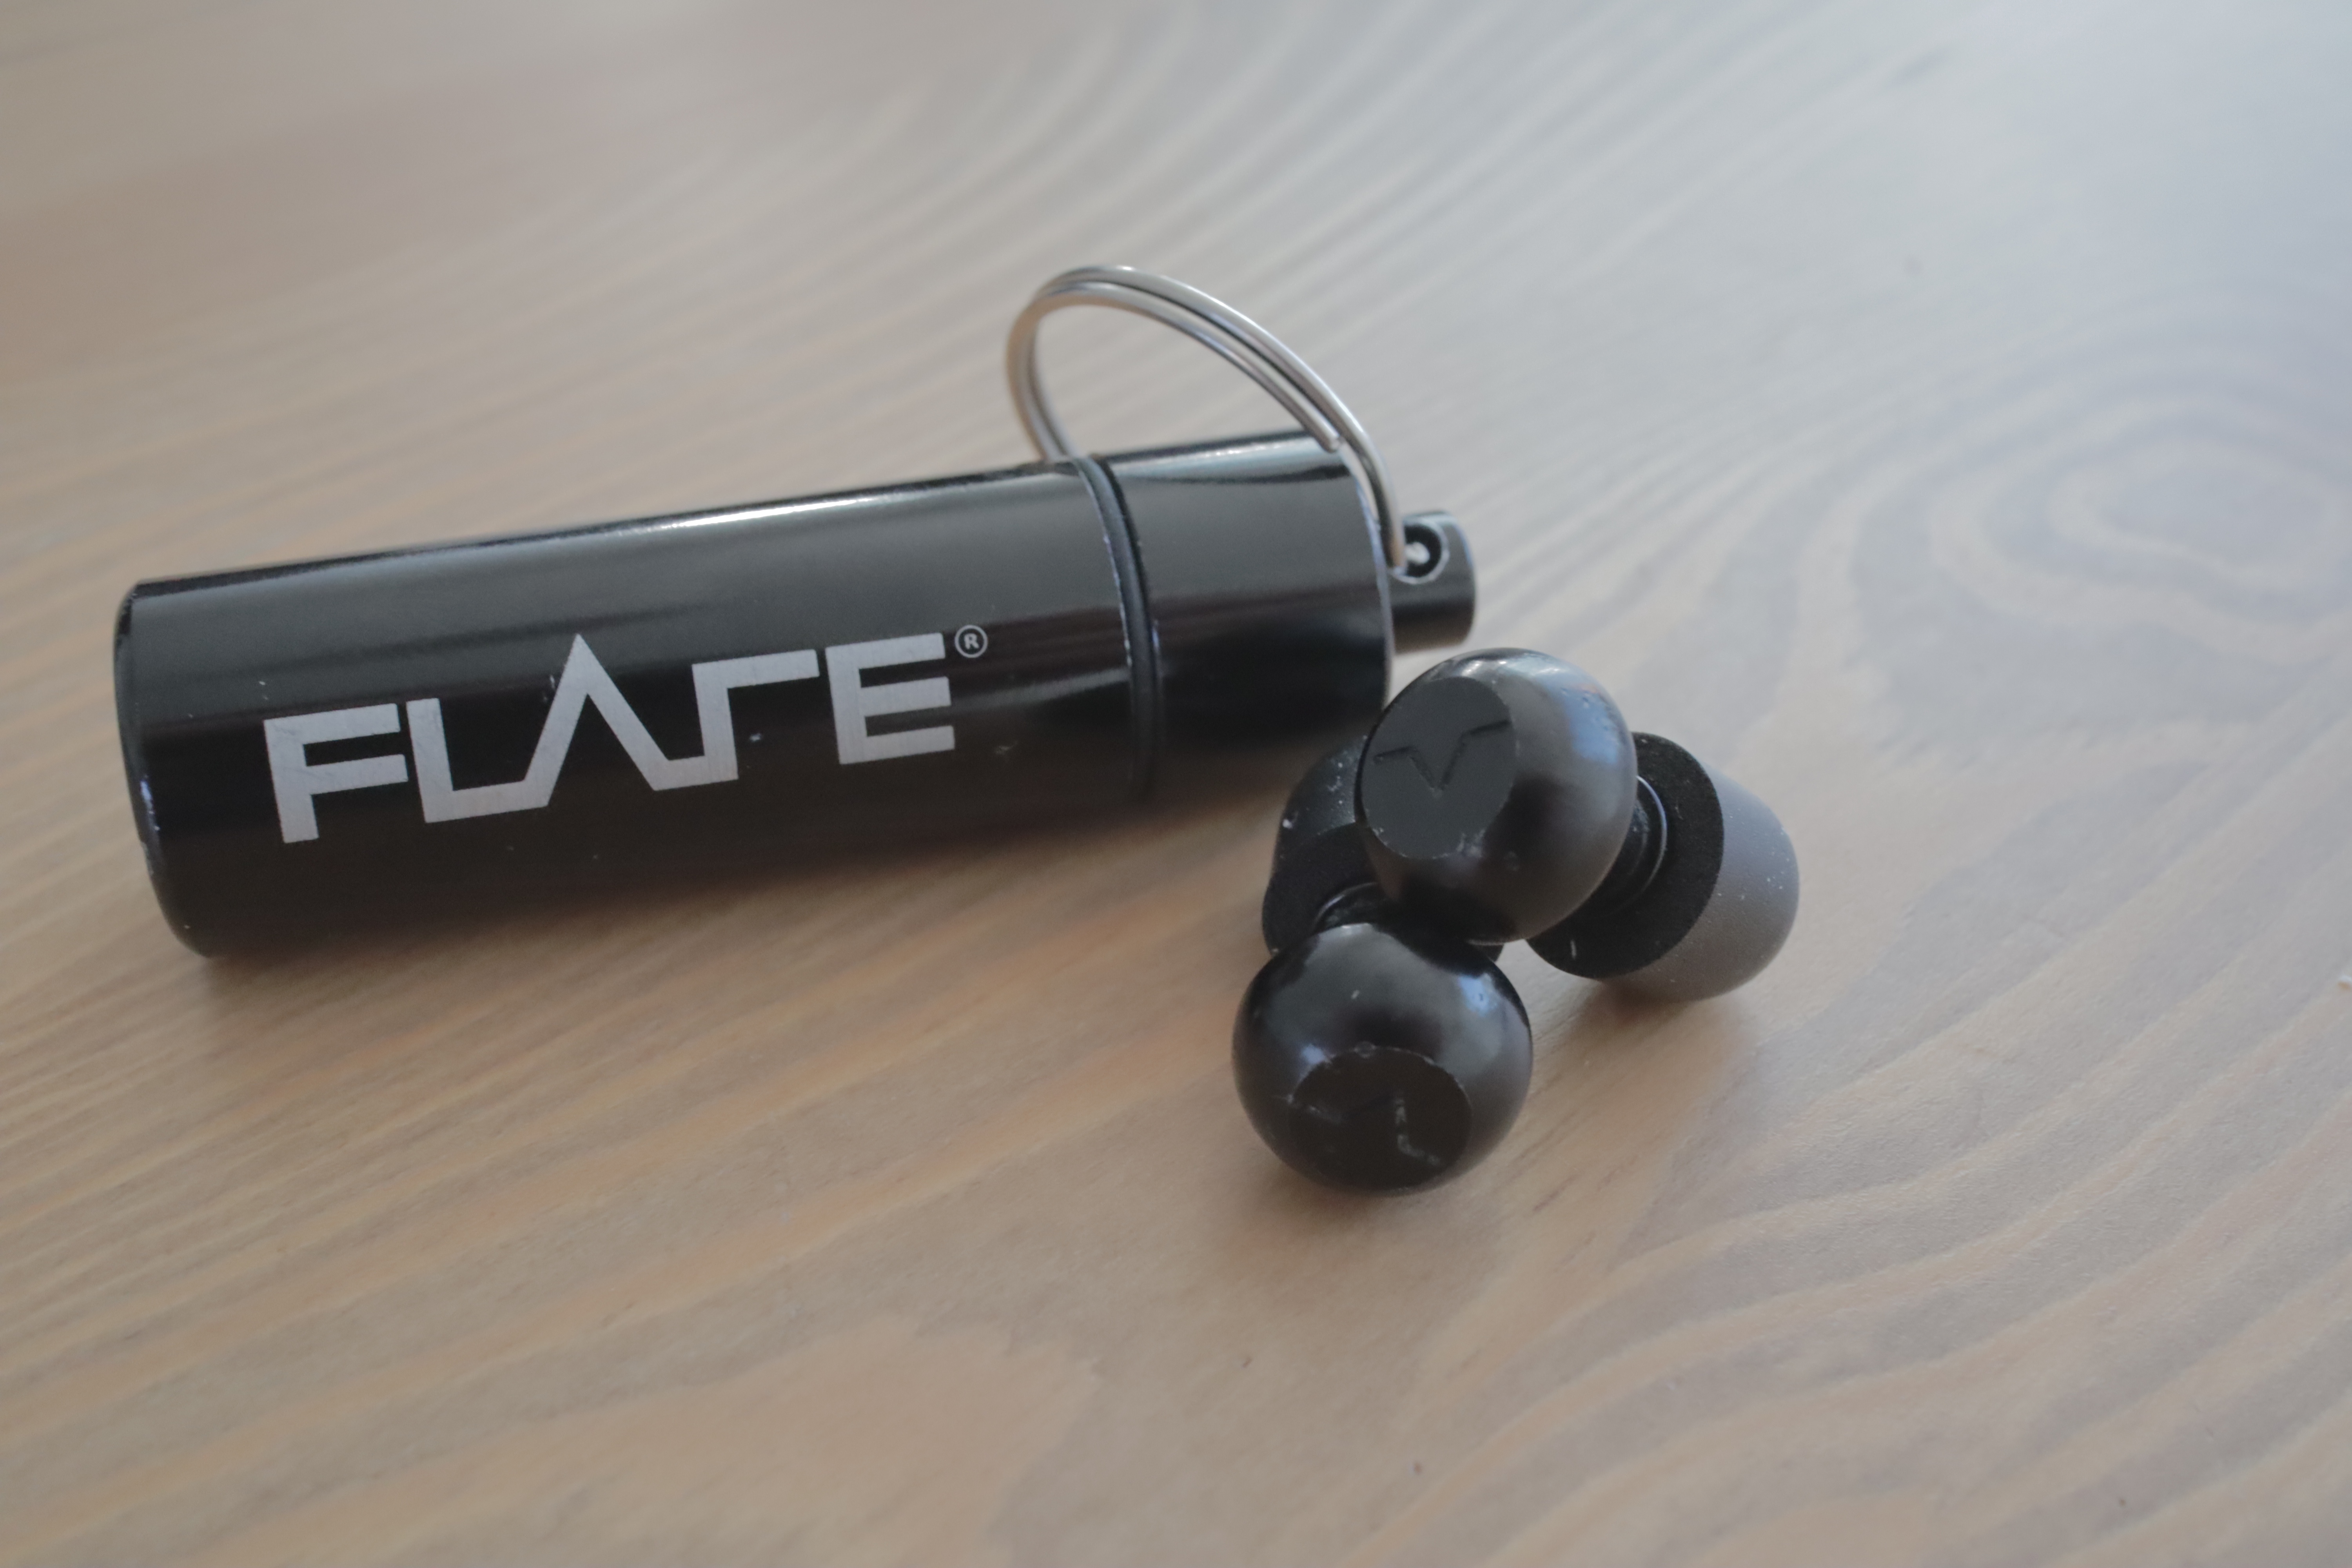
The Isolate plugs stand out from the crowd with the inclusion of a metal core to the foam plugs. Available with either aluminium (Standard) or Titanium (Pro) this allows for certain frequencies of sound to still be clearly audible to the wearer whilst the undesired sounds are reduced to a manageable level. That might sound like marketing bumph but it really works. From the outset the difference to the way the Isolates reduce sound was remarkable. My preferred disposable plugs mentioned above cut sound well, specifically an SNR of 39dB, but this reduction is to all sound leading to a sensation similar to swimming underwater. The Flares by contrast claim a reduction of slightly less at 32dB but not evenly across the sound spectrum. This means desired sounds like conversation with people when stopped, engine noise or even the sound of cars within your proximity aren’t as heavily cut out while the droning hum of wind and road noise remains reduced from it’s excess. Again not marketing bumph but my personal experience is that the Isolate plugs do this incredibly well, the sounds I don’t want to hear are just as well contained as with the 3M FX disposables. The desired sound makes a huge difference, I feel significantly more aware of my surroundings with these on and conversations as I’m getting going no longer involve people channeling their inner Brian Blessed. Another unexpected side benefit came in the form of my intercom’s volume. Previously I was having to bump this up to near max volume when wearing my plugs, impressively with the Isolate 2’s I had to drop that volume to 50% all while still being protected from the excess sounds of wind and road.

In terms of comfort the Isolates are fantastic, supplied with various sizes of tip I quickly found a fit that was both comfortable and effective. I had anticipated the metal element would add a level of discomfort when in use but they are equally as comfortable as the disposables I’ve used if not more so as the body of the plug is actually quite compact (even more so with the newest version available now). I’ve had no problems with the plugs coming dislodged when putting my helmets on or off and there’s plenty of clearance with the helmet liner in both my Shoei Neotec 2 and NXR despite bulky intercom speaker pods.

The earfoam tips themselves do harden over time becoming less effective at blocking out sound and Flare recommend replacing them once a month. That being said I’ve used mine daily for a year and roughly 5000 miles but have only replaced them once or twice in that time and even then I hadn’t noticed a huge loss in sound protection but did note the tips no longer holding their shape when squished. The cost is reasonable too with replacement tips available in packs of 6 for just £4.99. The metal body has also held up well with only limited scuffs despite my persistent clumsiness.

All in all these are a fantastic product that make riding a far calmer experience. Without a doubt Flare’s product will remain my go too and I’d highly recommend giving them a go. The version reviewed above has recently been superseded by a newer version simply named Isolate with a few improvements. They’ve now introduced a clear plastic version at £12.99 with the aluminium remaining at £19.99 and the pro Titanium coming in at £29.99. The updated design also features a new rounder Earfoam shape for a better sound seal finished off with a thinner centre shaft to improve comfort. I’m yet to try these but they look to follow in their predecessors footsteps and I look forward to giving them a go.

Disclaimer: As with nearly all the products reviewed on my blog the Isolates were bought with my own money and I have no link with Isolate. However here’s my customer referral link that gets you 10% off if you do decide to give them a try!

Atlas Throttle Lock

It’s no secret, I have a huge amount of love for my plucky 2016 Honda CB500X (check out my review here), but it isn’t without it’s compromises and shortcomings. One of those for me is the lack of cruise control. Even the fancy new 2022 model lacks ride by wire, modes and indeed cruise, and so it should, the CB is all about dependable, affordable adventuring and arguably the CB does that better than most.

That’s where the Atlas Throttle lock comes in. Now of course throttle locks aren’t anything new, they’ve come in many shapes and styles over the years but rarely with any great degree of success (in my experience). The principle is simple, some kind of mechanical lock that holds the throttle in a set position, not so much fixing the road speed but holding the engine speed. After coming across the Atlas on various reviews, in particular this article by ABR (Adventure Bike Rider) and a full review by ultimatemotorcycling.com I was persuaded to give it a try.

Those reviews do a great job of outlining the details that make the Atlas so good. But safe to say this is a beautifully engineered and well put together product. From the outset I was massively impressed by the strength of the mechanism, versatility of the design and the robustness the the product as a whole.

After nearly 10,000 miles of riding here’s how I found the Atlas in action:

Fitting + Setup

I would describe fitting the Atlas as fiddly not difficult. The most time consuming part was deciding where to position it vertically so as to keep the buttons in easy reach at motorway (or highway) speeds. All in it probably took less than 15 minutes with a little fettling after my first few rides once I got a sense of exactly where I wanted it positioned.

Worth noting the Atlas is available in 2 kit variations, top and bottom. The top version has the bulk of the mechanism above the bars and conversely the bottom kit has the mechanism below. The Atlas website has a handy list of which version is suited to different bikes. The CB can utilise both but due to my heated grips I opted for the top kit.

A single simple torx blot hold the lower clamp to the main body of the unit.

The large buttons give an extremely satisfying click when engaging/disengaging the Atlas and once in place it does a good job of holding the throttle with only slight slippage in the rain or on bumpier road surfaces. The unit works by friction holding the throttle in place against the fixed control pods of the bike via a sticky pad attached to a locking tongue on the Atlas. The CB500X isn’t ideal as the control pods are relativly small and a very rounded meaning there’s only a small contact area for the grippy pad however this doesn’t prevent it from working extremely well. That being said a bike with larger or squarer control pods will probably perform even better. The kit comes supplied with various thicknesses of grip pad to ensure a good fit for your bike and in hindsight the hold might be better on my CB with a slightly thicker pad (something I intend to try soon).

On the Road

In practice the Atlas serves a couple of really useful functions. The first is the most obvious, allowing me to rest my throttle hand on longer journeys, in particular motorway slogs. It does this really well, get up to speed lock the Atlas and then adjust slightly to maintain the desired speed. The fact the Atlas works via friction means the throttle remains movable both in the event of an emergency and for fine tuning speed.

The second big benefit I’ve discovered is in those inevitable moments when you need to quickly adjust a mirror, reposition a glove or faf with something. Assuming the road is safe ahead you can lock the throttle, free up your right hand for whatever adjustment you needed to make clicking it off once done, super simple and extremely useful. In fact I’d dare say this is my favourite benefit to having the Atlas fitted to my bike.

Blends into the control clusters really well.

Durability

After 10,000 miles in all weathers from a summer of heat waves to snowy commutes the Atlas has performed really well and looks as good as new. I had assumed the friction pad would thin over time but I can’t see any evidence of that yet and even if it does the kit came with several so I’m set for many miles to come.

Summary

Not long after fitting the Atlas I posted a picture of it on instagram with the caption “Probably the best motorcycle product I’ve bought” and I think 10k miles in I still agree with that. It’s a product that just works, does a job every day that makes riding that bit simpler and I’m not sure you can ask more than that.

The Gear – Kriega R22 Waterproof Rucksack

Arguably one of the most respected accessory brands in motorcycling today is the brilliant UK outfit Kreiga. Peruse any major motorcycle magazine or website and you’ll likely notice how many moto journalists out there seems to don one of Kriega’s various rucksacks and it’s easy to see why. Each and every piece of Kriega kit seems to be made to a exceptional level of quality and they have a long standing tradition of innovation on every level of design placing their end products above the competition.

One of Kriega’s most popular products seems to be the R20 rucksack. Perfectly sized for the commuting rider, utilising the fabulous Quad-lock Lite strap system and 10 years warranty, what’s not to like. Well for many years one factor seems to have held the R20 back and that was the lack of waterproofing. Anecdotally the R20 does actually manage surprisingly well in the wet but Kriega have finally bowed to customer feedback announcing the R22, fully waterproof and ready for adventure (or a soggy ride to work). After a couple of weeks and several 300 miles working and riding here’s my thoughts of the latest and greatest from Kriega.

With 22l of storage in total the R22 utilises an 18l removable dry sack to the rear of the bag with a deceptively large 4l pocket to the front. Both ‘compartments’ are super simple with a small key holder tab in the 4l front pocket but no other organisers or pockets. To the outside there are various strapping points to add a range of Kriega’s smaller pouches and US-drypacks great if you need to add a little extra space for a bigger ride. As it stands the 22l is perfect for day to day use swallowing loads more stuff than expected and the adjustable side compression straps make it really easy to adapt the bag to the contents.

The front pocket is the full length of the bag comfortably taking my iPad, notepad wallet, keys and all my odds and ends but worth remembering this compartment isn’t waterproof should you get caught in the rain. That being said previous Kriega rucksacks don’t claim any waterproofing credentials but seem to do a fair job of keeping the wet stuff out.

The 18l dry bag to the rear is where it gets interesting. The dry bag itself is fully removable, secured in place at the opening by velcro. This is great for so many different reasons from the ability to remove it when drying the outer rucksack after a wet ride through to cleaning and even the option of replacing it should the dry bag tire quicker than the main bag. Removing the dry bag also allows access to the space for fitting Kriega’s hydration pack neatly feeding the tube through concealed openings on the straps. The dry bag rolls shut to maintain its water tightness securing in place with adjustable clips to each side with a third compression strap across the top to hold it in place. Neat, simple and well thought through.

Like the R20 the R22 utilises the tried and tested Quad-lock Lite rucksack strap system and it is simply the best setup out there. Slightly toned down from the full on Quad-lock system on their bigger bags the Lite system’s structured straps and central clasp distribute weight away from your shoulders and arms avoiding any restriction on your movement when riding. It does this remarkably well and feels like no other bag I’ve used before. A small waist strap completes the setup and each piece is comfortable, hugely adjustable and solidly designed. Where the strap system really counts for me is weight in the bag. Day to day the amount I carry varies massively but even when packed full of stuff, multiple computers or even all my stuff for a weekend away I felt very little difference to my level of comfort and control.

Without a doubt Kriega’s build quality is some of the best out there and the R22 is no different. From the outset every bit of it feels like it was made to last and each material feels a cut about the rest. It’s no surprise that every time their products are mentioned on a forum or reviewed on a product page there’s multiple people saying they are still using theirs 10 years on with little to no noticeable wear. I have absolutely no doubt I’ll still be running round with the R22 in 10 years time, I dare say it’ll likely age better than I will. Coming in at £169 it certainly isn’t cheap but the quality difference is worth every penny.

Whilst I’m yet to put too many hard miles in, my R22 will be getting used and (carefully) abused over the coming months so I’ll update along the way but simply put if you need a rucksack that can do it all, last well and look good I don’t think you’ll beat the R22. It’s a massive thumbs up from me and well worth your consideration.

UPDATE:- Having ridden through some torrential rain over the last couple of days I can confirm the waterproofing is impressive even the front pocket that claims water resistance has remained bone dry. The dry sack naturally has been prefect too.

Fobo 2 Bike Bluetooth Tyre Pressure Monitoring System (TPMS)

Outside of the world of bikes it would be fair to say I’m a geek. I love a good gadget especially when it makes a boring a tedious task far simpler. Enter the Fobo Bike 2 Bluetooth Tyre Pressure Monitoring system.

Fobo Bike 2 Bluetooth TPMS

We all know tyre pressures make a huge difference especially on bikes and if you’re anything like me you probably don’t check them as often as you ought to. In December last year I stumbled across the crowd funding for the upcoming Fobo sensor system. Having previously had a ‘retrofit’ style system on my car I figured this was a great opportunity to keep an eye on my pressures without having to hard wire anything into the bike or add an unsightly display/control unit.

The Fobo system connects to a smartphone app via super low power Bluetooth 5 giving a constant reading on the tyres pressure when you are in range of the bike. It constantly monitors pressure and temperature giving warnings when the pressure reaches your pre defined limits and can be used in ‘overlay’ style so if like me you use your phone for navigation the pressures can be easily seen alongside your directions.

The hardware is beautiful. My previous experience of the aftermarket systems is that they can be bulky and cheap feeling however the Fobo ouses quality arriving with a simple locking system to secure the valves to your bike and replaceable cosmetic covers allowing you to tailor the look to your wheel for a discrete fit. The sensors also feature a digital anti theft system in that they can’t be paired with another device until unpaired from yours meaning if taken from your bike they are useless. The compact sensors are powered via coin style batteries and claim to last as much as a year. Battery levels are displayed in the app warning you in readiness for a change. So far mine are still displaying full charge after a few months daily use.

To backup the hardware is the mobile app. I’ve only had experience of the Android version which is good. Simple to use, once installed and setup a notification remains on your phone popping up with warnings if the pressures are beyond your preset limits (which are changeable within the app according to your bike/tyre specs). Within the app you can add multiple bikes so if you have a number of bikes all with sensors you can track them all. A number of features have been added to the app over time showing the manufacturers commitment to this growing platform and support have been great at getting back to me whenever I’ve had an issue. They recently added an overlay option which allows a small box displaying to pressures to remain on top of other apps. For me this sits alongside my navigation day to day so I can keep a constant eye on the tyres.

All in all I can’t fault the Fobo 2, my only tiny gripe is that you have to take the sensor off to top the tyre up but this isn’t really any more taxing than a conventional valve cap. It’s really well thought through system, simple to use, great quality and something I’ll be adding to any future bikes.

The Gear – Lomo Crash Bar Dry Bags (2 x 6.5l)

I’ve got a confession to make……I’m a bag hoarder. My wife has shoes, lots of them, I have rucksacks, dry bags, messenger bags, little travel organiser bags and did I mention rucksacks. But after nearly 18 months with a ‘adventure’ style bike I was yet to find a set of crash bar bags I was happy with, that is till once again Lomo stepped in with their take on the humble crash bar bag.

Some of you may have seen my review of the brilliant 15l Lomo tail pack earlier this year. I also spent the summer blasting around to different youth festivals fully loaded with Lomo’s throw over panniers which I plan to review soon. Much like both of these products the crash bar bags are extremely high quality, solid bags with well thought out touches and a price that tickles my Yorkshire genes.

Each bag is made from a thick tarp material with a roll top to ensure the contents is dry at all times. Although I haven’t had these out in the wet yet their sister product the 30l panniers were bone dry following a 8 hour ride in torrential rain and these will be no different I’m sure. The backs of each bag are toughened with an extra layer of hard grippy material giving some shape and protection to the bags (and engine bars).

Each bag has 3 straps, 2 horizontally that attach at the front on either side with standard loop buckles. The third strap is vertical compressing the roll top and or bracing some of bags weight at the top on the bars attaching with a clip. Obviously every bike will be different but this combination of strap provides loads of options for getting the bags strapped up to the bike nice and tight. For my CB500X I had the horizontal straps looped through in 3 places (2 on the top strap, 1 on the bottom) then the vertical strap over the top. Each strap has a number of loop holes on the bag (back and sides) which is a nice touch and shows the well thought out design that’s gone into them. After 6 hours of mixed riding yesterday on everything from motorway to bumpy and twisty single track roads the bags were solid, no movement or flapping around, I forgot they were even there!

Each bag is 6.5l and honestly I’m not sure I’d want anything bigger. I’ve previously tried 2x12l engine bar bags and they were cumbersome, bulky and I simply couldn’t get them to sit right (maybe a factor of a lightweight/smallish bike). Packed up yesterday with a couple of extra layers, snacks, water, flask, tool and puncture kits there was tonnes of room left. For bigger trips these are going to serve well as the home for easy access bits out on the road giving me just a bit more space to organise my gear.

All in all these are the perfect answer to my engine bar needs and they are highly recommended. When you factor in the £39 price tag you just can’t beat them.

Available direct from Lomo – Click Here

Check out my review of their 15l tail bag Here

The Gear – Held 9613 Citysafe Knee Protectors

The Golden Rule – “All of the gear all of the time”

The Gold Plated Reality – “Most of the gear most of the time”

I don’t know about other commuters but I love love love biking to work. The sheer glee of slipping through the endless lines of non moving traffic and the pleasure of parking conveniently for free makes the moto commute a true pleasure. That being said there are drawbacks. One of the big ones for me is gear, my work means as many as 4 locations in the working day which can mean more wardrobe changes that a west end show.

Since day one of biking I’ve found leg wear a nightmare. I have 3 sets of biking trousers; 2 pairs of jeans which needed a visit to the cobbler to come even close to the right length and one pair of touring trousers in a large ladies size (I’m not a lady). Fact is my legs must be odd. Add to that the general cut of biking trousers (90’s baggy or 90’s baggy) even with a decent well fitting pair I need to change to go about my working day………..or do I?

The Held Citysafe Knee Protectors provide an alternative to the full trouser with clip on clip off level 2 armour in a comfortable easy to stow away form factor. The full lower leg protectors are held in mesh backed water resistant nylon pouches that strap to your lower legs in a matter of seconds via 3 soft elasticated straps with large glove friendly clips. The straps are adjustable although I have them at their shortest they would easily expand for to larger legged rider (oo er). When paired with a pair of decent denim trousers in whatever cut you prefer they give you the protection you should have without the need for big baggy jeans or trousers throughout the day.

After just under 2 months of daily commuting in these I can honestly say they are the perfect answer to the problem of the commuting leg. The speed of the attachment, the comfort and the peace of mind given by level 2 armour held exactly where it needs to be make these knee protectors my go to lower leg protection.

That being said they aren’t without their flaws. I’d be kidding myself if I said they were stylish, they aren’t. That being said I only wear then when I’m riding removing them before I go anywhere on foot so not really a problem. I did find the straps a little long for my little legs and I may even have the cobbler add a little extra Velcro. Obviously they aren’t going to suit the cold wet winter here in the UK but for autumn spring summer jobs a gud ‘un.

All in all I’d highly recommend these for anyone wanting a simple quick change commuting option and for £52.99 I think they are a worthwhile investment. (Available via the brilliant team at Get Geared – Ps not sponsored 😦 but they are the best and my local)

The Bike – Pyramid Plastic Fantastic

Not long after getting my current bike I discovered some small design flaws (I hope you’re listening Honda). Firstly there’s the exhaust routing, it’s almost like they intentionally placed the super hot stainless down pipes right behind the front wheel to keep me busy with cleaning, and don’t get me started on the belly pan which seems to be perfectly designed to collect road crud from the aforementioned wheel. Secondly there’s the rear shock, again placed within perfect flinging distance of the rear tyre unshrouded and unprotected. It became clear I needed to add some crud catching add ons if I were to have any hope of the bike making it’s 3 or 4 or 5 birthday. A quick Google later presented me with a disappointing selection of big name products that were a little ugly and priced to bring on coronary incident.

Thankfully Squires saved the day – A conversation with a fellow CB500X owner at ye old faithful Squires pointed me to a company I hadn’t heard of before Pyramid Plastics. Based just over the border in Guy Martin territory they had a brilliant selection of affordable products designed to protect the CB and save me from endless shock cleans. Within a few days I had an extenda fenda and rear hugger for significantly less than the price of the hugger alone elsewhere.

The Extenda Fenda

Formed to marry perfectly with the end of the stock mudguard I opted for the sick on version held in place by super strong double sided adhesive foam. I was hesitant that this would be strong enough but equally hesitant about drilling holes in my lovely new bike. Safe to say the sticky stuff is chuffing strong. Word of warning if you fit one of these be careful you get it right first time, it’s has some serious staying power once married up. I skipped the included metal clips to aid the curing process and instead clamped it up with an army of j clamps. Months and many miles later it’s solid and even scrubbing it during a thorough bike wash there no feeling of movement at the join at all.

No drilling necessary-Do Pyramid do dental work?

But does it work? Well in short yes, the CB’s engine is full of nooks and crannys which previously spent their life getting gunked up with spray from the wheels, that has all but stopped. The belly pan still catches a lot of spray but short of going full Indian Cheiftain on it I couldn’t ask from more from the Extenda Fenda. For less than £20 I was and remain chuffed.

Excuse the water streaks!

The Hugger

Prior to finding Pyramid’s range I was presented with the dissapointing list of £100+ chain guards/huggers. I know I know that’s the traditional way to add a hugger but they were expensive and appeared to have taken their design ques from the channel tunnel.

In comes the £50 Pyramid Plastics hugger. It’s design won’t be to everyone’s taste but I like the angular pointyness (not sure that’s a word). I still think for a piece of plastic it’s a tad pricy but it is less than half the cost of anything else I could find and looks 10x better in my opinion.

The mounting setup will scare some people, a single large cable tie attaches to the swingarm’s crossmember passing through the shock mount on it’s way to centralise the guard. Like the extenda fenda the hugger is moulded to perfectly form around the bike although I did find that once fitted it sat a little too close to the rear tyre for my liking. After some investigation I found the rubber pad designed to tip the trailing edge of the extenda away from the tyre just wasn’t thick enough. A small piece of foam and some super glue later and all is well. It’s worth saying I contacted Pyramid about this and they were extremely helpful even sending out some extra rubber padding and additional large cable ties, top customer service.

Excuse the crud!

After many miles and a few months of all weather riding it certainly does it’s job. The rear shock and linkage remain much cleaner, there hasn’t been any unwanted movement from the hugger. It’s discreet and in keeping with the bikes design achieving the golden quality mark of any bolt on part.

Round Up

So if you need a break from cleaning the crud from bits that really ought to be protected better then I couldn’t recommend Pyramid more. Great affordable products, not perfect in the case of the hugger but good looking and with careful fitting a brilliant addition to solve a frustrating bit of design from Honda.

The Gear – Lomo 15L Tail Pack

Not heard of Lomo before? Me neither until my father in law introduced me to the brand thanks to his love for swimming and all things watersports. Started in 2000, Lomo seem to be dedicated to high quality, well thought out and reasonably priced products. Making everything from wetsuits to cycling accessories Lomo have recently branched into the world of motorcycle launching a number of brilliant new luggage products at prices that are hard to believe.

For the past 2 years I’ve moto-commuted daily. The question of luggage is one I’ve wrestled with from day one. For starters the options seem endless; hard panniers, soft panniers, top box, rucksack, tank bag, tail pack etc…… each comes with it’s own degree of compromise. For the first year I went with the rucksack (the brilliant Knox Studio to be exact). Pros – No attaching to the bike, simple, useful off bike, as inconspicuous as a bearded man in Shoreditch. Cons – Sweaty back, danger of over packing = bad back, restriction to movement on bike, did I mention sweaty back? Hard panniers didn’t seem to make sense either, besides their enormous cost I’ve never been a fan of adding width to my bike. Tank bags don’t rock my world either, most wouldn’t look out of place on a space suit. So what about a tail bag………

A successful birthday resulted in a bright yellow arrival, the Lomo 15L waterproof tail bag (and a set of Lomo Panniers, review coming soon). The 15L perfectly fitted the bill for my daily bag; affordable, completely waterproof, big enough but not massive, super easy to connect to my bike and durable enough to not need replacing anytime soon. So after a month of commuting with it how does it stack up?

The design is a simple but very well thought out one. Made from durable PVC the bag uses the classic roll top design with the addition of a top zip to keep it’s contents perfectly dry. Side and top clips help to keep the bag compressed and at 15L it’s a perfect size for daily use comfortably carrying my youth worker resources, lunch, a change of clothes and a tablet or laptop. The addition of a small outer pocket provides a great home for wallets, earplugs, keys etc and an included shoulder strap takes care of the carrying at the other end.

Included with the bag are a pair of straps designed to be left attached to the bike. These make fitting and removing the bag a super quick job with little to no faffing and effort, 4 clips and you’re done. Whilst every bike will vary the straps are versatile and can be used in different ways to give a good fit no matter what you ride. There are various mounting loops and tether points on the bag so there’s loads of options to mount to other bags, parts of the bike or even pedal bikes should you be so inclined.

Only avalible in one colour, high viz yellow it’s look won’t be to everyone’s liking but it sure makes you stand out on the road. And despite it’s technical appearance I’ve had loads of non biking staff in the various schools I work in ask for details about where to get one.

After a month of daily use the bag has put up with lots of bashing around, drops, scrapes slips and scuffs and remains un marked. With a quick spray of water or a damp cloth it looks as good as the day I opened it.

Now here’s the kicker. It only costs £30, including the shoulder strap and mounting straps. To put it into context that’s almost the same price as some other brands charge for waterproof liners, and less than a third of the price of Kriega’s US20 the other bag I had in mind.

All in all, great brand, fantastic quality affordable bike bag with a tonne of features. It’s an A* from me.

The Bike – 2016 Honda CB500X

So most of the up coming ‘bike’ posts will be about the bits I’ve added but the following is my general review of the bike written for thebikemarket.co.uk enjoy.

Good value and as versatile as a Swiss Army knife. I’ve now had my 2016 CB500X a little over 6 months and covered 3,000 miles (it’s now been just shy of a year and coming up to #ride5000) through all weathers for fun and function. The little CB has so far proved itself to be a fantastic first bike and a brilliant step into the world of big bikes.

I bought my CB with just over 2,000 miles on it from a friend who unlike some of the bike media had nothing but good things to say about it. I’m glad to say he was right and much of the media’s complaints have in my experience been proved wrong.

I’ve found the bike to be super versatile handling every kind of riding fantastically well. On the daily commute it couldn’t be much better, it’s comfortable and easy to ride providing a great balance of power and efficiency (I’ve averaged 82mpg throughout my ownership). The height and width make the bike perfect for filtering through challenging traffic scenarios and whatever the weather the LED headlight and general presence of the bike really help with being seen.

It’s also been a great companion on fun spirited rides through the countryside. When pushed the I’ve found the CB to be responsive and forgiving tackling twisty country roads carrying pace well and handling the often poor road conditions with ease. It’s engine capacity is all usable so you feel like you really get to push towards the bikes limit unlike bigger bikes that rarely get beyond their mid-range. It has even proven to be comfortable for big mile motorway cruises sitting happily at speed for hours at a time without excessive vibration and with plenty of power to overtake and pick up pace where necessary.

The 2016+ models comes with a few changes over the original which means I’ve not had to change much however I did add some engine bars for protection, a fender extender and rear hugger. The latter two are very worthwhile as the front of the engine block is a real crud catcher as is the rear shock. I have also fitted a spoiler to the top of the screen as even at it’s highest setting I was getting more buffeting than I’d like (I’m 5”9 by the way so not overly tall). I personally have found the riding position and seat comfort to be perfect, no complaints there at all even after 6+ hours in the seat. The bike has been super reliable and easy to maintain so far needing nothing more than chain lube and a good clean here and there. It has typical Honda build quality and with a just a little TLC it looks as good as new even with a punishing all weather commuter life.

The under seat storage is surprisingly big and I manage to get a large disc lock, thick D-lock and a few odds and ends under there although the seat takes some serious practice to quickly remove and refit. The official (and aftermarket) luggage is expensive but the pillion seat and handles are a great spot to tie down large bags and loads as proven by an industrial coffee machine, 18 year old cruiser wheels and the many other items the little CB has successfully carried for me.

IMG_20180803_161953

In summary I would highly recommend the CB500X and there is very little I’d change about it. The bike has tackled everything I’ve thrown at it with ease and given me very little reason to ever want to replace it as my daily bike. Top job Honda.

Who.Why.What. #itbegins

Who.
This blog isn’t really about me but sometimes it’s nice to know the face behind words so here goes. I’m Ben. I’m a late 20’s Yorkshireman who 2 years ago decided to get the mid life crisis out of the way nice and early becoming the proud owner of a 16 year old Japanese cruiser. Fast forward two years and I think I’ve learnt a thing or two along the way. The bike has changed, as has the gear but the escape and freedom provided remains the same. In the day I work for a Christian charity as a youth worker, and at night (that is when I’m not biking or in the garage) I can usually be found chasing a cheeky border terrier round the local park closely followed by my beautiful wife.

the beginning
Step one – The 125 – Suzuki VL125 Intruder

Why.
Honestly I’m not really sure. I don’t pretend to possess any great knowledge or skill, nor do I expect any great following. I just wanted to share my journey and the bits that make the journey happen. I’ve always loved writing, photography and mechanics, so I figured let’s combine them! Also I’ve always held a particular love for product reviews. This may seem a strange thing but for as long as I remember I’ve skipped to the product review pages of magazines first. I read copious reviews before purchasing anything but then more often than I’d like I struggle to find decent reviews of the kinds of bike products I like, that is Yorkshireman (tight) priced products. All of these things contribute to the why, whether my posts are helpful or of interest to you…..I’ll let you decide that one.

Today
Today’s bike – The blessing that is my Honda CB500X

What.
I’m not big on plans (that’s a lie, I love plans I’m just fond of tangents and diversions too.). For the next little while I’m going to focus on 4 things. The bike and the various additions I’ve made to it – currently a 2016 Honda CB500X. Secondly the gear – more than I care to admit, some great, some good, some requires improvement. Thirdly my journey to biking – day to day experiences and the occasional rant. And finally the ride – pics, routes and cafes. Beyond all of that I love the existing world of bike news, blogs and vlogs so there will be plenty of that too.

Hope you’ll join me for the journey, please be gentle!

B

Adobe_20180802_010623